Advanced Bands
Top  Previous  Next

Not all users will need to have a thorough knowledge of what follows, especially if you only need to change the layout of a few reports and insert a logo. However, a good understanding of grouping will help with more advanced reports and will help prevent breaking your report by moving or inserting a component to the wrong place.

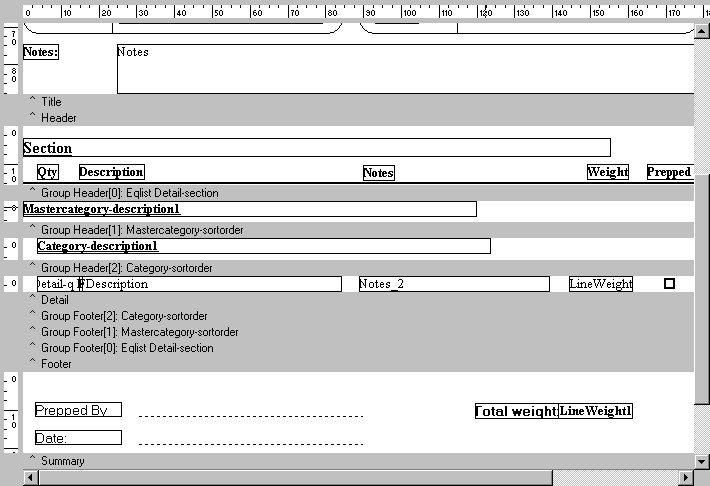
Here we see an area of Prep Sheet report.

reportbands2

We see that there are SIX extra bands , three above the Detail band and three below. These bands belong to three Groups that have been added to the report to help us organise the data. There is a always header and a footer for each Group, therefore we have six new bands of information.

We see that the first group, Group Header(0), is based upon the Eqlist_Detail.Section field. What does this mean? Rental Desk supports multiple sections within an equipment list, allowing you to split up a single booking into useful zones. Its very likely therefore that you will want your reports to organise the data by each section on a list, so we have introduced a group to do this. As the report is reading the data it has been told to go a fetch, Group Header(0) forces the report to do two things:

·First, it sorts the data by section  
 
·Second as the report is running, it only updates the data components in the Group Header(0) if it discovers that something has changed. Every line on an equipment list stores a reference to the section to which it has been placed. You may have 100 lines but only 3 sections. If we didn't have a group for an equipment list section and we simply placed the data component for the section field in the Details Band then we would get the same data repeating on many lines when the report ran. Putting the component in the Group Header(0) band means that it only gets printed 3 times and below each section heading we get a list of equipment that belong to that section.  

Next we have Group Header(1) which is based upon the MasterCategory-SortOrder field. In this group there is a DBText component linked to the MasterCategory-DescriptionA field. Having this group nested inside Group Header(1) will mean that each equipment list section that prints will have subheadings for each MasterCategory of equipment assigned to this section. Moreover, the order that the MasterCategories will appear in will be determined by the sort order for MasterCategories that you have set up in the Rental Desk Equipment Book.

We should quickly be able to see that Group Header(2) , by being based upon the Category-SortOrder field and having a DBText component linked to the Category-DescriptionA field, will print a heading for each Category of equipment belonging to a MasterCategory heading, and again the order the Category headings will reflect the sort orders set up in the Equipment Book. Finally, the actual details of the equipment will print under the each Category heading.

So our report would be organized as:

Section 1  
   Master Category A  
      Category A  
      Category B  
   Master Category B  
      Category C  
      Category D  
 
Section 2  
   Master Category A  
      Category A  
      Category E  
   Master Category C  
      Category F  
      Category H  

Too many heading and sub-sections? Do you want to simplify the look of a report? Maybe you don't want to see every Category, just each MasterCategory. That is no problem. If you right click on the Group Header(1) band you will be able to uncheck the Visible property when you preview the report it will be hidden. The really good news is that all though you no longer see each Category, the data is still be sorted and grouped by Category.SortOrder, so the output still shows all your kit in the order you have set up in the Equipment Book.

Group Footers function just like the group headers, however these typically are used for sub-totals.