

|
How to create a New Job
|


|

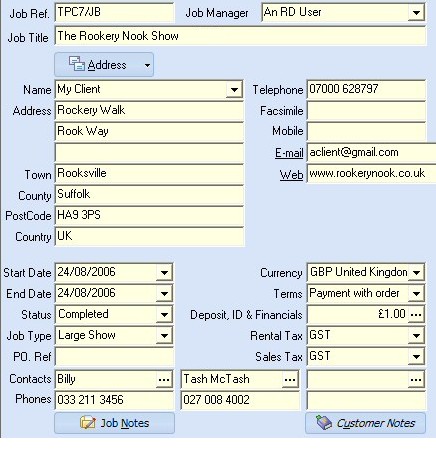
| Job Ref | The Job Reference is the number assigned to your job and will be automatically created according to the numbering system that is set up in the Configuration Window.
|
|
|
| Job Manager | This is the person that created the job or the person responsible for the job. The names list comes from the users list set up in the configuration.
|
|
|
| Job Title | A job is given a name or a title if needed. Giving a job title will make it easier to distinguish different jobs for the same customer.
|
|
|
| Address Button | The Address Button allows you to create a new address, a new delivery address or a new accounting address for your new company. Once entered, you can also select these addresses to be used on your equipment list. If a new address has been created for that company, you may also select the old or superseded address. You may also permanently alter the address of any company by taking the currently entered address and changing it to a new default address.
|
|
|
| Company Name | A job is typically created for a company or customer. If a company has already been entered in the address book, as you enter the company name RentalDesk will scroll to that company and the address will be automatically entered. If the company is new and is not in the address book, you will be prompted to add the company to the address book. If you enter "Yes", then the address is permanently stored in the address book for future use. If you respond with "No", the company information is only entered in the job book, and cannot be used again. It is a good idea to keep a customer's information in the address book for future use.
|
|
|
| Start/End Dates | These are the dates when the job begins and ends. Any equipment list created for this job will use these dates as the defaults for charging and for making the equipment unavailable for other jobs.
|
|
|
| Status | The status refers to the probability or condition of the job or equipment list. It is important to keep the status of jobs and equipment lists accurate as the status can impact the availability of your inventory for your rental start and end dates.
|
|
|
| Job Type | The Job Type can be used for creating reports that show turnover based on job type. Job Types are added in the Configuration view by clicking on Job Types. Some typical examples would be Equipment Rental, Party, etc.
|
|
|
| PO Ref | If your customer uses purchase orders, this is where you would store your customers GPO number for this job.
|
|
|
| Currency | If you operate your business in an area that may use 2 separate currencies, then you should pick the currency for this job.
|
|
|
| Terms | The terms for this customer are displayed here. RentalDesk will use the terms that are setup in the address book for this customer. If no default terms have been entered, the RentalDesk will use "Not Set" as the terms for this customer.
|
|
|
| Deposit, ID & Financials | The Deposit field is used to record a deposit for this job. Additional financial information about the job can also be stored here, including payment history, credit card information, a picture of the customer and any payments made for the job.
|
|
|
| Rental Tax | This is the tax to be charged on your rental equipment. This defaults to the value set in the Address book for this company. If no default tax has been set for a company, then the system tax is chosen. A different tax rate can be selected from the drop down list if required. Tax rates are defined in the configuration view.
|
|
|
| Sales Tax | This is the tax to be charged on your sales equipment or consumables. This defaults to the value set in the Address book for this company. If no default tax has been set for a company, then the system tax is chosen. A different tax rate can be selected from the drop down list if required. Tax rates are defined in the configuration view.
|
|
|
| Contacts | You may store up to 3 contacts for each job. Simply type the name of the contact in any of the 3 fields. You may also choose a contact from a company's list of contact people by clicking the open window button.
|
|
|
| Job Notes | These are notes that are specific to this Job/Equipment List and are only stored against this Job/Equipment List.
|
|
|
| Customer Notes | These are notes about the selected customer. Any additions to the Customer Notes will follow that customer for any past, present or future jobs.
|