|
Configuration of Testing |
  
|
|
Configuration of Testing |
|
To utilize the Testing Module, you must first configure your equipment. The program must know which type of Pat Tester and Barcode Reader you will be using and which type of tests will need to be carried out on your stock. You should begin by specifying your Tester & Reader.
Tester & Reader
This part of the set-up is specific to each workstation in which testing will be performed. It is possible for the tests you define to be carried out using different testers, provided the workstation being used at the time is configured for the tester you are using. The tests themselves cannot be tester specific because each type of kit can only have one set of tests assigned to it.
To Configure your reader:
1. Tab: ![]()
2. Button: ![]()
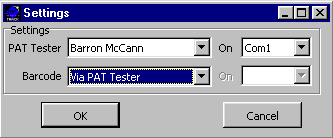
3. Select from the drop down menus the model of PAT Tester you will be using to carry out the tests. Select the COM port to which it is normally attached. The Barcode drop down menu give you options for how your barcode reader will be attached to your PC.
The Baron McCann tester allows your barcode reader to connect directly to a COM port or to connect via the tester. Seaward testers have only one serial port, therefore you will need to connect the barcode reader to its own COM port. If you are using a Seaward tester, then specifying a port for your reader is only relevant if you want the convenience of being able to scan equipment out on jobs while your are PAT testing.
If you select the Barron McCann model as your tester then it should be connected to the computer when you open the Testing Module. If it isn't connected, the module will take a while to open because it will be trying to establish communication with the tester. After several failed attempts to establish communication you will be asked if you wish to continue using Testing in a "manual" mode. If you are only configuring Testing (as opposed to carrying out tests) then you can proceed by clicking 'OK'.
Manual or User Tests
The Manual or User Tests is where you define tests which must be carried out before the electrical and physical tests are performed on an Item. If you are using a Seaward tester, it will carry out it's own pre-test checks before it runs the actual electrical test. However, you still need to define three user tests for each test schedule as a safety precaution. If your Seaward tester breaks down and you have to borrow a Barron McCann tester, the pre-test checks will be essential.
Examples of these tests would be to check the plug wiring or mains cables for damage. The idea for the Manual Test is to identify faults which may cause serious damage or personal injury if electrical or physical tests were applied without first making these checks.
To Setup a User Test
1. Button: ![]() Manual Test
Manual Test
2. Button: ![]() New Test.
New Test.
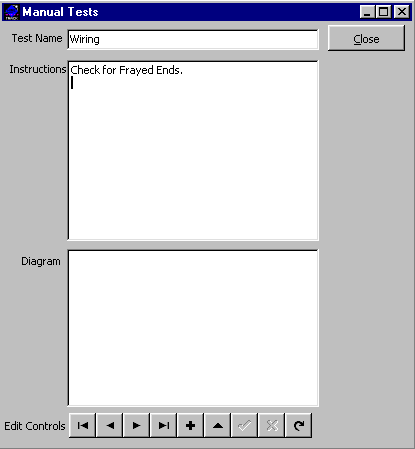
3. Enter a Test name.
4. Enter instructions for how each test should be carried out.
5. You may attach a diagram or picture to a test. Right click in the Diagram box and load the file from its source.
6. Button: ![]() Update.
Update.
7. Use the buttons ![]() to view other user tests.
to view other user tests.
Formal Tests
You may define as many tests as you need to cover your testing schedule. They will fall into two categories: electrical tests and physical tests.
To create a Test:
1. Button: ![]() Add New
Add New
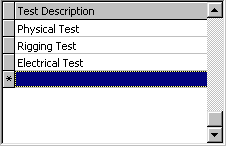
2. Enter your Test Description
3. Select which type of test you wish.
![]()
4. Your available options will be displayed depending on the type of test you have chosen.
Electrical Tests
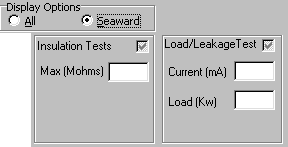
If you have chosen the Test Type - Electrical, The Display Options defaults to ALL,
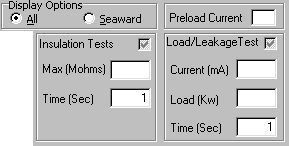
but if you are using a Seaward tester you can make the field panel hide irrelevant fields.
If you are using a Barron McCann tester then you need to enter the ![]() . This is the load that is drawn by a piece of equipment when it is first switched on. You might need to test this with a meter if you don't know the correct value.
. This is the load that is drawn by a piece of equipment when it is first switched on. You might need to test this with a meter if you don't know the correct value.
While this field might appear to be specific to each type of equipment, in practice the pre-load current will be the same for whole groups of equipment. For example the you might have a test called "Lights Up to 1kW", and all the types of lighting which use this test will have the same pre-load current value. In this respect your tests tend to "group" types of equipment in a similar way to categories of equipment.
Note: if no value is entered in the pre-load current field because you normally use a Seaward tester, but at a later date a Barron McCann test is used to carry out the test, then the program will pass the tester a default value of 13amps for this field.
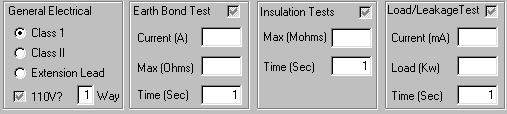
Under General Electrical select the class that meets the classification of your equipment kit falls. Select Class 1 for equipment which is earth grounded. Class 2 is for equipment which is double insulated and does not have an earth ground cable. Extension leads fall into their own class. You will note that the test fields available will vary according to the class selected.
If the kit uses a 110V supply then select this option by ticking the check the box. Finally you need to specify how many ways an item should be tested. This determines how many circuits the tests will be performed on. A Par Can lantern would be tested 1-way; a piece of Socopex would be tested 6-ways. If one if the circuits fails a test then the overall test result is a fail.
Once you have filled in the General Electrical information, select the electrical tests you wished performed, such as the Earth Bond Test, The Insulation tests or The Load/Leakage Tests.
Warning:
A FLASH TEST is a high voltage insulation test. It should only be applied if you are confident that the test voltage (1500V AC is typical) will not cause damage to capacitors and sensitive electronic devices in the appliance. Furthermore, because of the high voltage used extra precaution should be taken to avoid risk to personal injury when the test is carried out.
Click ![]() "Update" to save the electrical test definition.
"Update" to save the electrical test definition.
Physical Tests
When defining a new physical test you will also need to specify where the equipment will be tested...
1) internally (default), i.e. by your staff or
2) externally, i.e. by a contractor. For each test description definition you must also configure four test routines which you will perform.
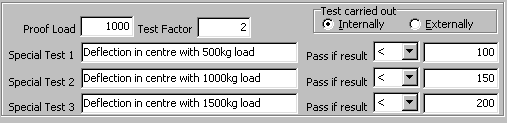
In the Proof Load field enter the weight which will be applied to the item when you have carried out a proof load test. You must also specify what the test factor will be for this safety check. This value is used to calculate the safe working load for that type. If the proof load is 2000kg and the test factor is 4 then the safe working load for the item is considered to be 500kg.
You will then need to define three special tests to be performed. In the special test descriptions it is a good idea to include the unit types being measured (Example"Deflection under 100kg load (mm)") because the pass/fail values that you enter are arbitrary. Select a 'comparison operator' from the drop down menu and then enter a value that the test result must be equal to (=), less than (<), greater than (>), not equal to (<>), less than or equal to (<=), greater than or equal to (>=).
Click ![]() Update to save the physical test definition. You are now ready to assign the specific test to the equipment types.
Update to save the physical test definition. You are now ready to assign the specific test to the equipment types.