|
Adding Specific Users |
  
|
|
Adding Specific Users |
|
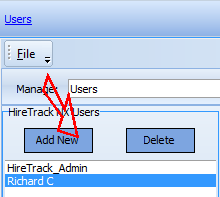
To add a new User, go to software Configuration Tab> General and select Users from the drop down

First select the new User button
A Window will appear prompting you to enter the Username and Password you wish to use
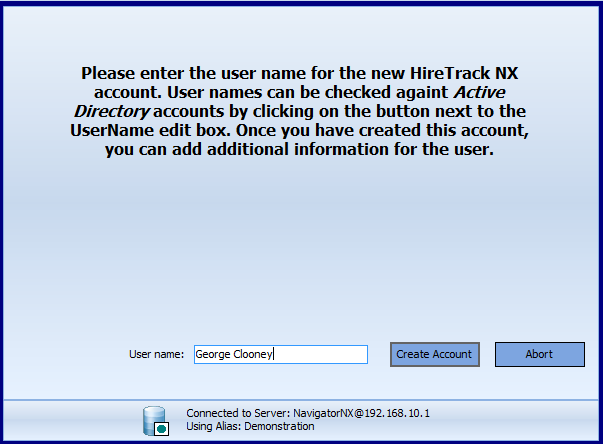
After the account is created, You simply need to enter the email details for the User. The User will then have to add the additional information.
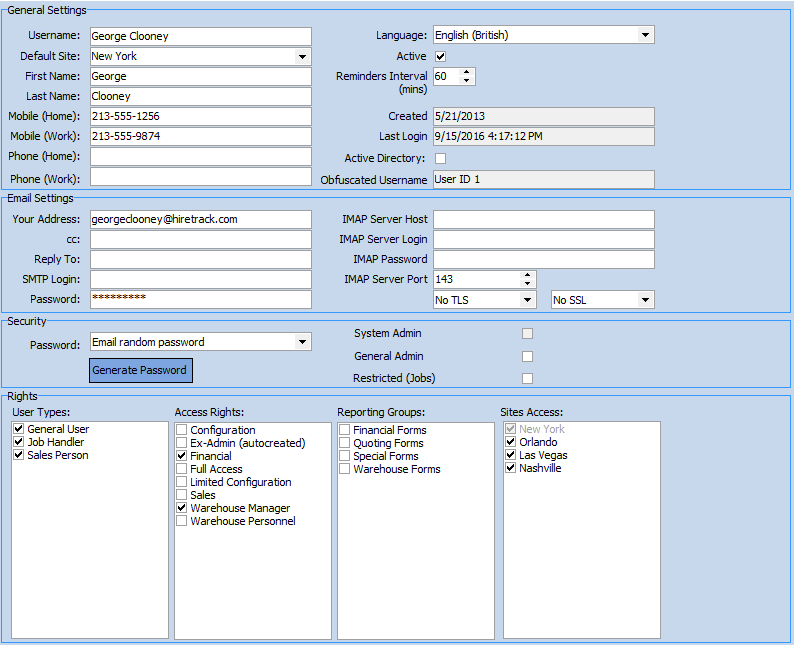
General Settings
Username |
This is the login name for the system. You can use any name you desire, but it's usually recommended to use First Name and Last Name |
Default Site |
This will be the user's default site for which they normally work. The user will always begin in this site, and depending on permissions may switch to other sites. |
Forename/Surname |
The users first name and last name. This is important for reporting & email templates |
Phone Numbers |
Up to 4 different phone numbers may be stored here. Some companies have re-purposed home numbers for other uses like title or alternative email |
Language |
The default language that will be used when this user logs into HireTrack. |
Active |
Once any history or usage on this account has been entered into the database, it is not possible to delete a user. However, you can deactivate a user so their record cannot be used in the future while maintaining the data integrity of the users information. |
Reminders Interval |
The period of time for this user's reminders to appear. |
Created Date |
Date the user is created |
Last Login |
The last time the user logged into HireTrack. |
Active Directory |
If the Active Directory functions are activated, this will need to be ticked to activate this user using Active Directory. See Setting Up Active Directory |
Obfuscated Username |
This displays the users name when data is encrypted due to GDPR regulations. |
*Most of this information can be entered/edited BY THE USER on the My HireTrack Details page
Email Settings
Your Address |
Enter the recipient email address of the user. |
cc |
If you wish for this user to cc a colleague or some other email address, you will enter the email address here. |
Reply To |
Enter the email address to which the recipient of the email should reply. Leave blank to reply to the users email address. |
SMTP Login |
Enter the users EMAIL USER login. In most cases, this is the email address of the user. This will allow the user to SEND emails from within HireTrack NX. |
Password |
This is the USER'S EMAIL PASSWORD (NOT the HireTrack login password!). This will authenticate their credentials with the SMTP Email Server in order to send Emails from within HireTrack NX. |
IMAP Settings |
Security
Following the creation of a new user, the administrator needs to provide the user with a temporary password. There 3 ways to create this password:

Email random password |
Once you have entered the users email address, you will then need to send that user a Password creation email. This email will come from the HireTrack System Administrator account. The user will receive a temporary password and then be prompted to create a new password. |
Popup random password |
Selecting this option will generate a random password on screen which an administrator may then copy and paste into another program like an email. This selection is helpful when the System Administrator email is not functioning or before the email is configured. |
Popup PIN |
Selecting this option will generate a 4 digit PIN NUMBER on screen which an administrator may then copy and paste into another program like an email. This selection is helpful when the System Administrator email is not functioning or before the email is configured. |
The System Admin checkbox is disabled and will only appear when the System Administrator account is selected. When logged in a System Admin there are no restrictions to any part of the program.
Users that are set as General Administrators have additional functionality including:
| • | Launch the Configuration Book |
| • | Has access to the "Queries" menu in the QBE, which allows creating, cloning etc. |
| • | Make manual adjustments to Audit Trail in the Inventory Book |
| • | Change the Anti-Fraud status in the Job Book |
| • | Authorize actions in the Warehousing such as allowing an item out even though it test certification has expired |
| • | Save Invoicing Options on invoices and orders |
A Restricted (Jobs) user are users for which you wish to provide access to only specific jobs instead of all jobs in the system. The user must be granted all the same rights to the job book as a normal user, but instead of being able to access all jobs in the system, they will only be able to access the jobs for which they have been selected on the Restricted Users tab of the Job Book. To restrict access to searching for jobs, you will want to create a Reporting Group identified as restricted users and then create a search query that restricts the user to only the jobs for which they have access.
Rights
You will assign that user as a User Type. The options are:
| • | General User - Someone who can log on and use the program. |
| • | Job Handler - The User will appear in the drop down on the Job Book to allow them to be selected as the Job Handler |
| • | Sales Person - The User will appear in the drop down on the Job Book to allow them to be selected as the Sales Person. |
You will also need to select the Access Rights which have been configured in the User Groups.
Reporting Groups allow you to assign specific reports or printouts to specific people in a reporting group. For instance, you may have certain financial reports that only senior management needs access. Once the reporting group is created, you can then assign a specific individual to a Reporting Group. Click here to configure Reporting Groups.
If you are running a Multi-site version of HireTrack NX, you can restrict users to see only information related to a specific site. You will set their Default Site in the General Settings, but their additional sites are set in the Site Access Panel.
PLEASE NOTE: There is no SAVE BUTTON for users as the system will automatically save as you go. This may require you changing or clicking on another field, but be sure to look for: ![]() at the bottom of the screen.
at the bottom of the screen.