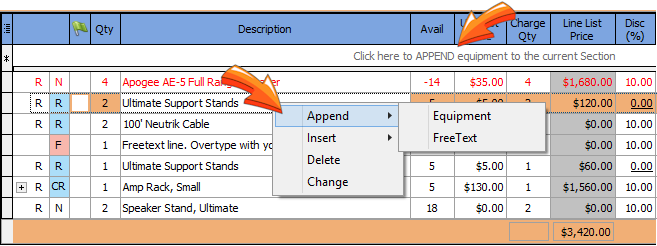
To add equipment to a list either
| • | click on the line 'Click here to append equipment to the current Section' |
| • | use the insert key to insert equipment at the current position |
| • | use the end key to append equipment at the end of the section |
| • | right click on a line and select the append insert options on the pop up menu' |

This will bring up the "PopStock" selector.
The Popstock has 3 Regions
| 1. | The Search Mode panel allows you to use a "Tree View" in which you can drill down to select certain Master Categories and Categories of equipment. Alternatively, you can press F2 key to limit the list to show items that have been marked as favourites in the Equipment Book or use the F3 to initiate a Smart Search. |
| 2. | The Types Panel displays all the types of equipment selected in the search panel and displays important inventory information about each type of equipment. |
| 3. | The Basket Displays the equipment you have selected allong with any reminders that may be required for that type. These reminders are editable. |

Located on the left of the Popstock is a list of MASTER CATEGORIES. By Pressing the + icon next to the master category, and a list of CATEGORIES assigned to the master category. By clicking either the Master Category or the Category, a list of types will appear in the Types Panel from which you can select a quantity. Alternatively, you can press F2 key to limit the list to show items that have been marked as favourites in the Equipment Book or use the F3 to initiate a Smart Search which is located at the bottom of the types panel.
Keyboard shortcuts may be applied to each Master Category in the Inventory Book on the Configurations Page
The Types Panel displays all the equipment selected in the Search Mode Panel or the result of the Smart Search. This panel has many useful tools to assist you in identifying and locating the equipment you require. You will enter your quantity in the BOOK column for the equipment you require, which will then add that equipment to the basket.

1 |
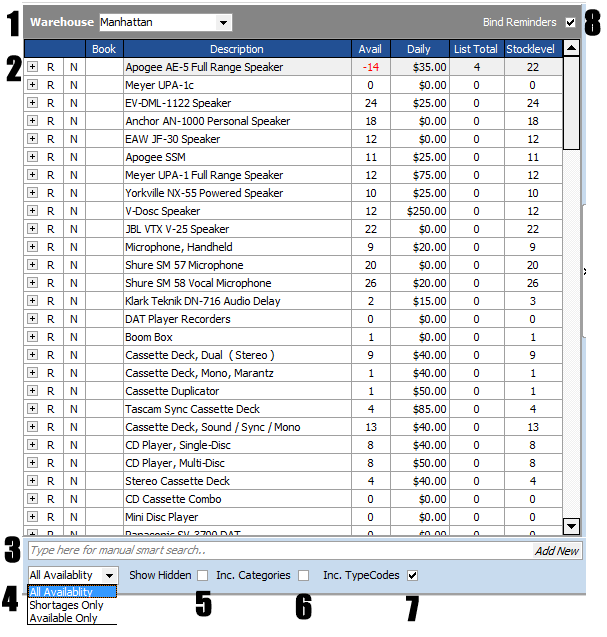
The Warehouse Panel displays the warehouse from where you are selecting equipment. This is the warehouse of the equipment list by default, but you may select to view and reserve equipment from whichever site's warehouses that your permission allows you access. Selecting equipment from another warehouse will create a Job Transfer for that single line on the equipment list editor grid. |
||||||||||||||||||||||||||||||||||||||||||||||||||||
2 |
The Grid has 8 columns, with some level of interaction.
|
||||||||||||||||||||||||||||||||||||||||||||||||||||
3 |
Smart Search
Smart Searching works by matching up to three words or parts of the word. For instance if you type 'Mic' followed by a spacethe list would display:
Microphone, Handheld Shure SM 57 Microphone Shure SM 58 Microphone Shure Beta 57 Microphone Mic Stand Shure Wireless Microphone Sennheiser Microphone
If you add SM then space it would show any items with Mic and SM in the title so only 2 types would be shown:
You will then enter a quantity required in the Book Column and press the enter key to add the type to your bacIn the middle is the selector area where by entering a quantity will add those types to the shopping basket on the right.
Note: Depending on your Security Permissions, if a type of equipment does not exist in your system, you can press the Add New Button and add the type to the inventory.
|
||||||||||||||||||||||||||||||||||||||||||||||||||||
4 |
Show Availability Filter - Select whether you would like to view:
|
||||||||||||||||||||||||||||||||||||||||||||||||||||
5 |
Show Hidden - Displays Equipment where the visibility is set to Optional in the Inventory Book. |
||||||||||||||||||||||||||||||||||||||||||||||||||||
6 |
Inc. Categories - Adds the category descriptions to the Smart Search (described above) to display all types that match the entered text AND all types in the category that matches the entered text.
Here we have entered 'rig' in the smart search, and we see 'rig' in the (1) type with upright in the description and (2) types that are in the 'rigging' category. |
||||||||||||||||||||||||||||||||||||||||||||||||||||
7 |
Inc. Typecodes - Adds typecodes to the Smart Search (described above) to display all types that match the entered text and all typecodes that matches the entered text. |
||||||||||||||||||||||||||||||||||||||||||||||||||||
8 |
Bind Reminders - This function reassigns any reminder types to the same category as the origin equipment. This option is available to group a type on the equipment list with it's reminders. For example, a lighting instrument may have a safety cable as a reminder, which you may wish to appear with the light instead of the safety cable appearing in it's own category.
Example:
An example of BIND REMINDERS Unchecked.
An example of BIND REMINDERS checked. |
Once you have selected equipment using the Search and Types Panel using the BOOK column, it will appear in the basket before it is added to the equipment list. If you make a mistake. simply change the qty in the basket to 0, and the type will not be added to your equipment list.
|
|